Using GitHub
We will be using Git, GitHub, and GitHub Classroom in this class to manage assignments, labs, and projects. Git is version management software used to keep a set of files related to a single assignment, lab, or project in a single unit called a Git repository. We will use GitHub Classroom to enable you to create your own private or team repository for each assignment, lab, or project. Each repository will be initialized with the files the Professor provides, including a "README.md" file that contains the instructions for the assignment, lab, or project. The Professor and TA's have access to your repository, and can provide advice, and grade your results once the assignment due date occurs.
Contents:
Github: Set up and Registration
We will be using Github to submit your labs and assignments throughout this course. You will need a Github account, so if you don't have one already, go to https://github.com and sign up to get a free GitHub password and userid.
The professor and TA's need to know your GitHub userid so that we know whose work we are grading. Once you have signed up for an account, go to myCourses, click on "Homework Submissions", and fill out the GitHub Userid survey, which simply asks you for your GitHub userid.
When the CA's and TA's grade the first assignment, they will check the results of your GitHub Userid survey to figure out your GitHub userid and grade the assignments and labs. After verifying that your GitHub userid is correct, the CA's or TA's will copy your GitHub Userid into the Grade Center "GitHub Userid" column. If there are any problems, please contact the TA responsible for your lab section.
arrow_back
GitHub: Credentials
When you use GitHub, you need to provide your GitHub userid and password. Many web browsers such as the Google Chrome web browser remember your GitHub userid and password for you. (If you have multiple GitHub accounts, this can become confusing, so it's easiest to use just one account.) Integrated Development Environments such as Eclipse can also often save your GitHub userid and password for you. However, when we are using git in a command line mode, git will often prompt for your userid and password every time you do most git commands.
One alternative is to install a Git "Credential Manager" that can save your git userid and password and provide it to Git whenever it needs it. The one I use is Git-Credential-Manager Core, which has a free MIT license, and can be installed on Windows, Mac, or Linux. Once I installed this on my Windows machine, and provided my userid and password on the command line once, GCM-core remembered my Git userid and password from then on!
arrow_back
CS-140 Git Workflow
In CS-140, we will be using two basic workflows, depending on whether an assignment is an individual assignment, or, as in the case of labs and projects, the assignment is a team assignment.
Individual Assignment Workflow
- Accept an Assignment using a GitHub Classroom invitation URL. This will create a master repository for you, initialized with the Professor's README, and any initial files provided to you by the professor.
- Browse your master repository to see the directions and look at the files provided to you.
- Clone your master repository to create a local repository
- If you have a local repository, and something has changed in the master repository since your last clone or commit, do a git pull to copy those changes from the master repository to your local version of the repository. For an individual assignment, this should happen very rarely unless you have multiple local repositories.
- Edit the files in your local repository. If you need to create new files, don't forget to add these to your repository using a git add command. Test your changes, and make sure they work correctly.
- Once everything works correctly, do a git commit command to commit the changes to your local repository.
- Then do a git push command to copy your committed changes in the local repository to the master repository.
- Repeat the edit / commit / push process above until the assignment is complete.
Team Assignment Workflow
- Create or Join a Team. For labs, teams will be created for you by randomly selecting other students in your lab group. For projects, you will be allowed to create your own teams.
- One team member needs to Accept the assignment using a GitHub Classroom invitation URL. This will create a master repository for the entire team, initialized with the Professor's README, and any initial files provided to you by the professor. All team members have permission to update this repository.
- Browse the team master repository to see the directions and look at the files provided to you.
- Clone your master repository to create a local repository
- If you have a local repository, and something has changed in the master repository since your last clone or commit, do a git pull to copy those changes from the master repository to your local version of the repository. For team assignments, this should happen almost always, especially if a teammate has made changes to the repository.
- Decide which team member should make the next changes to the repository. That team member should edit the files in his or her local repository. If she or he need to create new files, don't forget to add these to the repository using a git add command. Test the changes, and make sure they work correctly. Warning: please avoid the case where more than one team member is making edits at a single time. Avoid conflicts!
- Once everything works correctly, do a git commit command to commit the changes to your local repository.
- Then do a git push command to copy your committed changes in the local repository to the team's master repository.
- Let all the other team members know that the master repository has been updated.
- Repeat the edit / commit / push process above until the assignment is complete.
arrow_back
Accept an Assignment or Lab
The Professor will create a GitHub Classroom assignment for each homework assignment or lab, and provide the invitation URL for that assignment to you. If you want to try things out, here is a test invitation link(It's probably easiest to right click, and select "Open link in a new tab" so you can flip back to these instructions.)
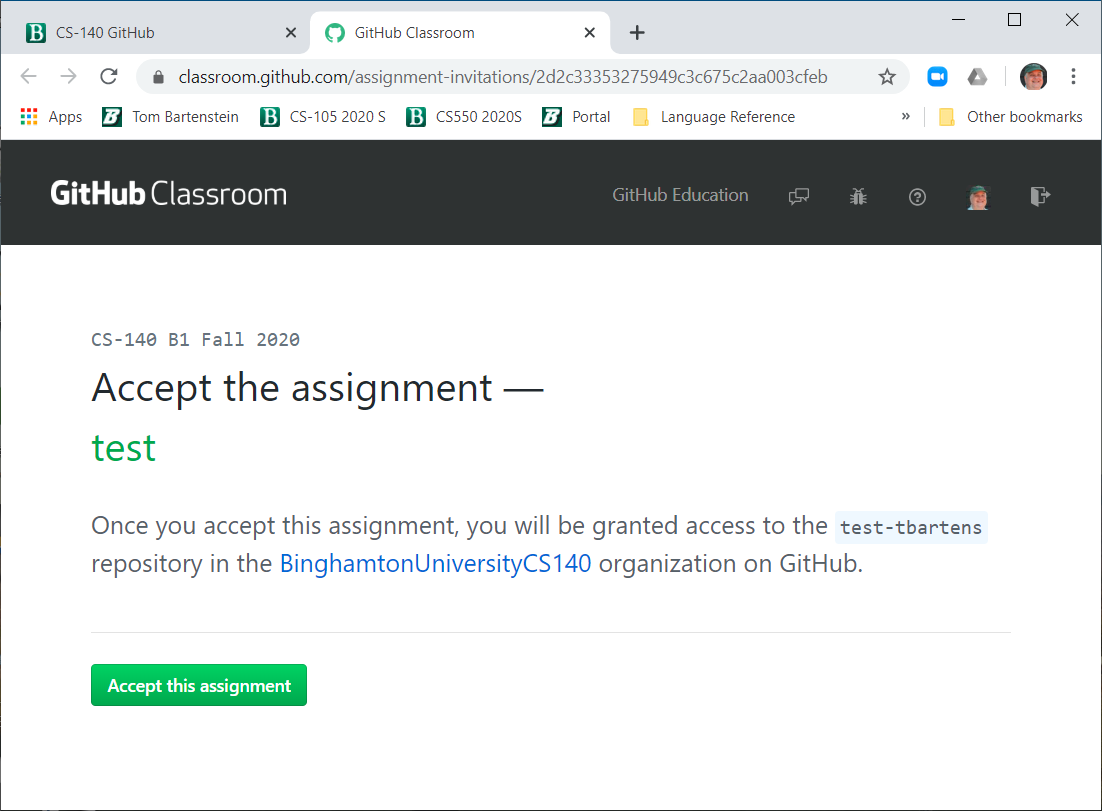
When you navigate to the invitation link for the first time, GitHub Classroom will ask you if you wish to accept the invitation, such as in the following illustration:
When you press the "Accept this assignment" button, then GitHub Classroom will automatically create a private repository for you, initialized with any template code or instructions the Professor has provided. (You may need to log in to Git with your Git Userid and Password before the accept is complete, but once you've logged in once on the current system, you should get a cookie for Git that remembers your userid and password.) You well get a "ready to go" screen, like:
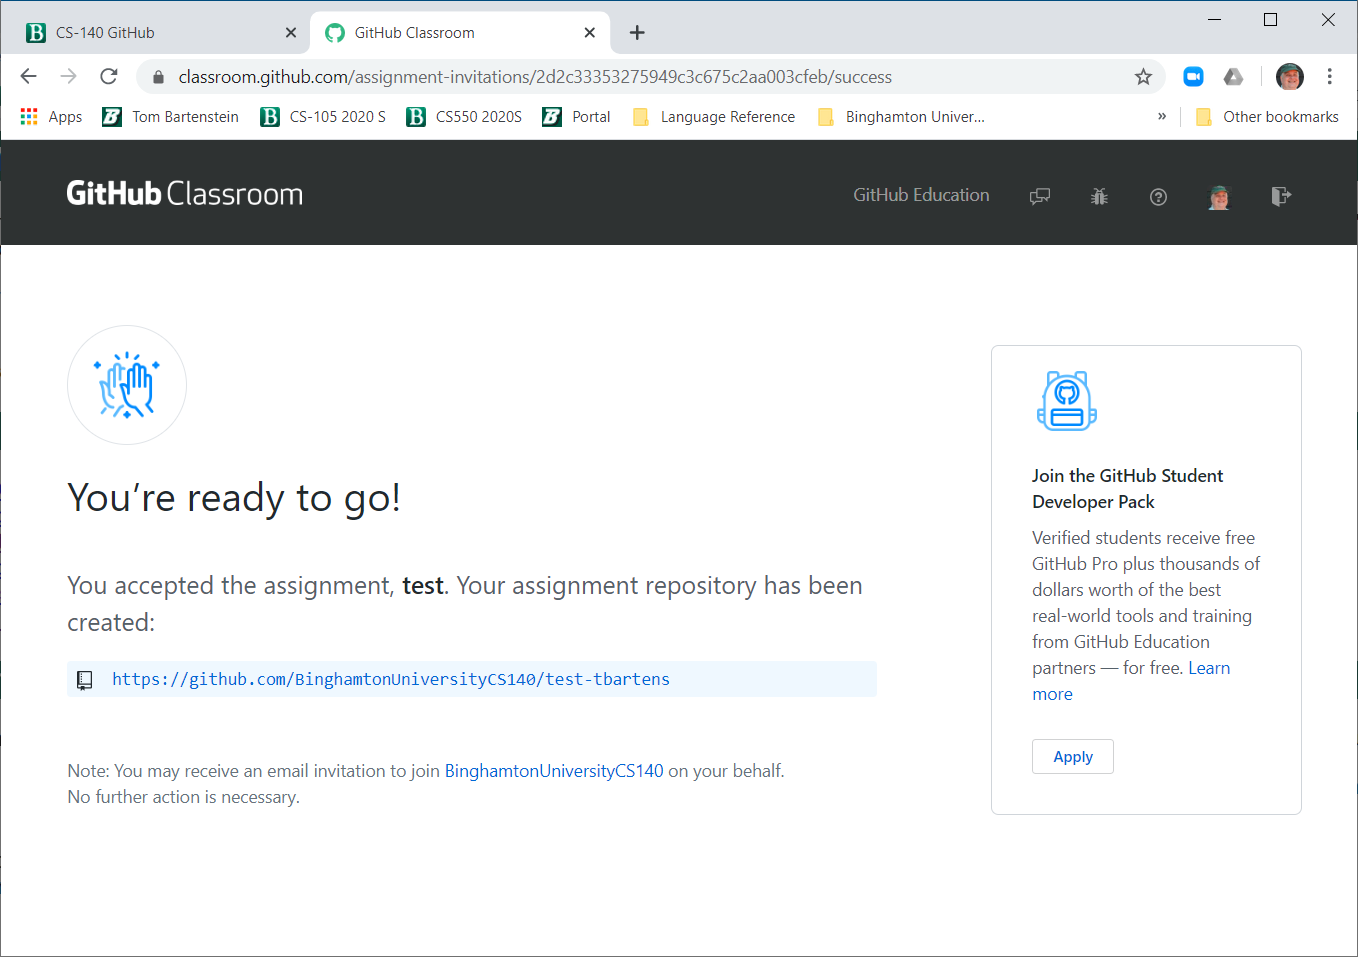
The repository name will start with whatever prefix the Professor has specified (usually "lab01" or "hw01" and so on), followed by a dash, followed by your Git userid. For instance, if you accept the test invitation above, you will get a repository called "test-userid", where userid is your Git userid.
You will see that the "ready to go" screen contains a hyperlink to the web browser view of your master repository. This is the URL associated with your master repository, and it consists of the prefix, https://, followed by the address of the Microsoft GitHub site, github.com, followed by our class organization name, which in this case is BinghamtonUniversityCS140, followed by the repository name itself. You can click on this hyperlink to view your new repository.
If you navigate to the invitation link after you have accepted the invitation, GitHub Classroom will take you straight to the "ready to go" screen without making you re-accept.
arrow_back
Look at your Repository in the Web
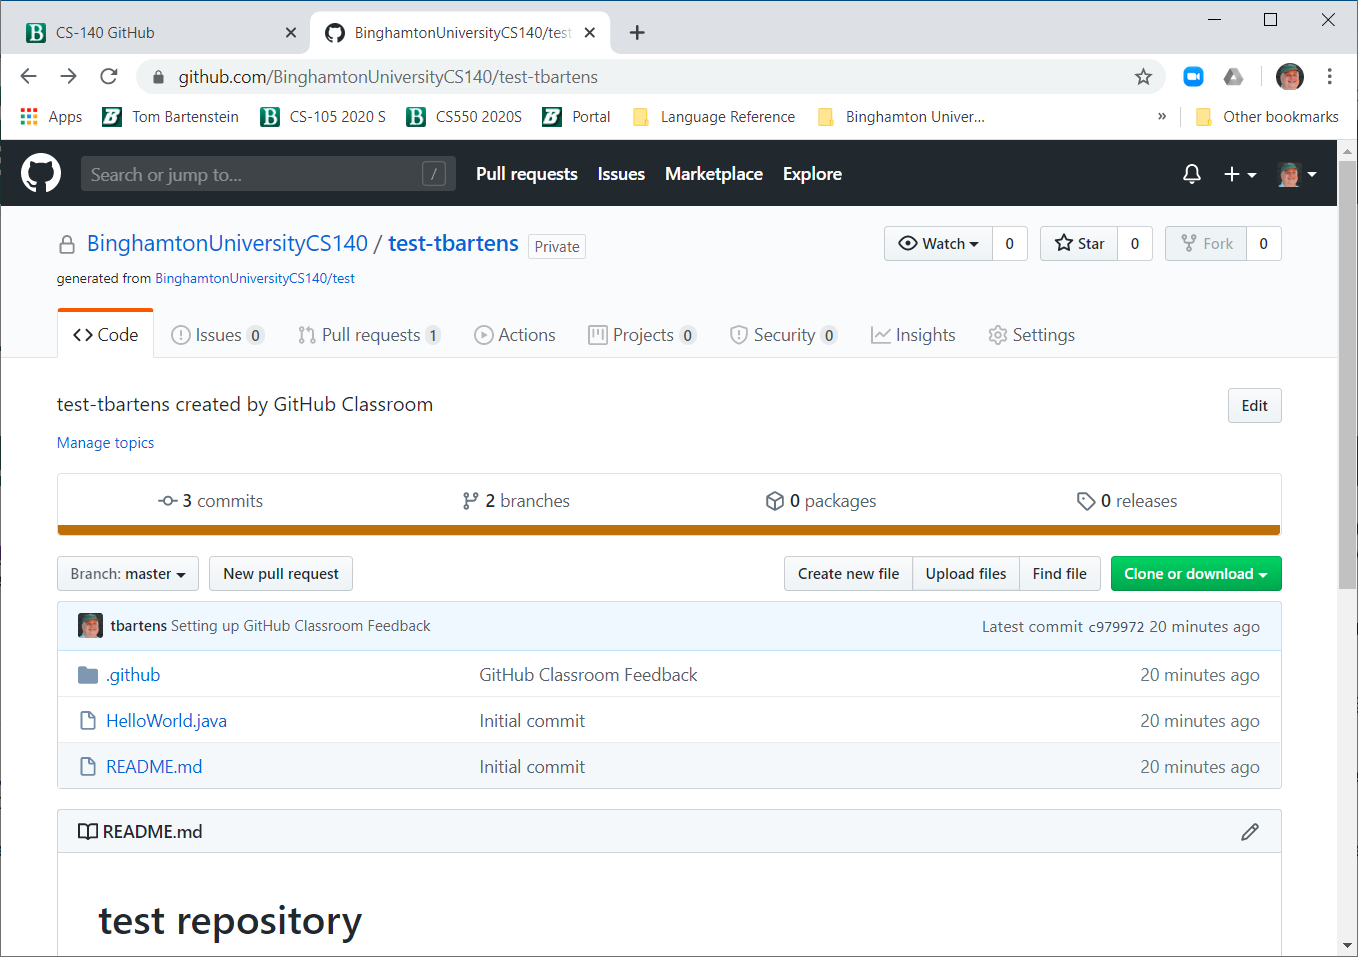
When you open a view of your repository in the web, you are looking at the cloud version of your repository. The upper left of the screen has links to the organization (class) you belong to, the repository, and the repository used to initialize your private repository. Under that are several tabs, with the leftmost tab called "Code" highlighted. This is the tab we will use almost exclusively (although we may use the "Issues" tab for automated assistance from the CA's or professor.)
Underneath the orange horizontal line, on the right of the screen, is a green "Clone or download" button. If you click on that button, You will see the URL associated with this repository. Click on the clipboard icon to copy that URL to your cut/paste buffer. This is the URL that you will need to clone your repository.
If you keep reading down, you will see the list of files in the repository, including any java code provided by the instructor or added by you, once you commit new code files. These are hyperlinks so you can look at the code in those files.
The last thing in the "Code" tab is "README.md". The .md file type is markdown, which enables the Professor to provide a formatted set of instructions that describe how to complete the assignment.
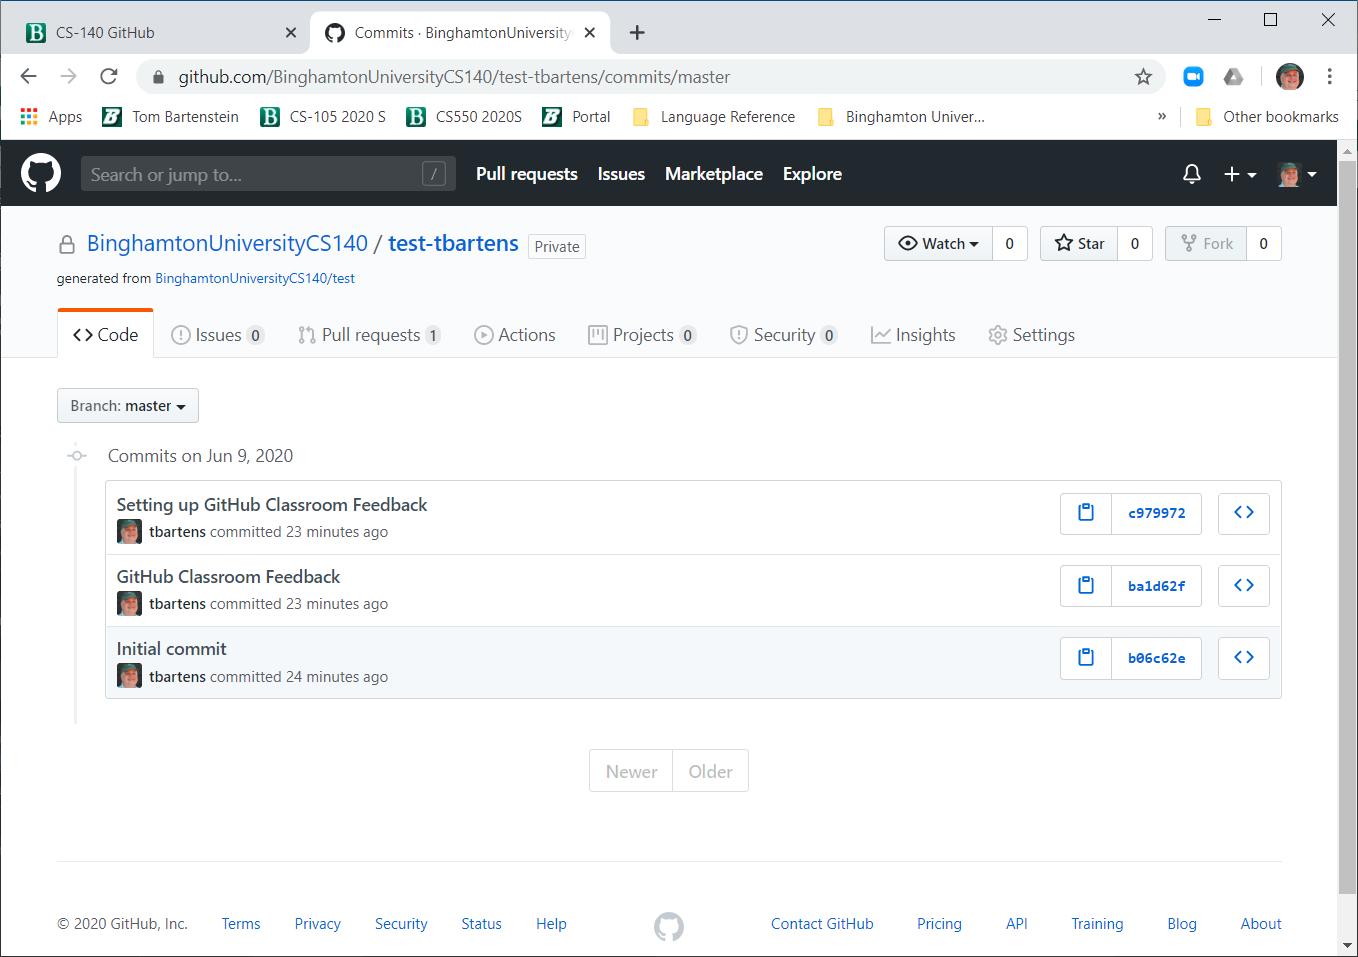
In the "Code" tab is a link to "commits". If you click on that link, you will see the history of this repository, showing each committed version of that repository. You can use this link to go back to earlier versions.
If you click on the clipboard icon, you will save the commit hash code for the specific commit in your cut-paste buffer. Clicking on the hashcode itself shows the changes made at that commit level from the previous level. Click on the <> button to see the code in the repository at that commit level.
arrow_back
Clone Your Repository
When you look at your repository using a web browser, you are looking at the master copy of your repository. You will need a local copy of the repository on disk in order to edit, compile, and test any changes to the repository. You make a local copy of your repository by cloning it.
Clone your repository by opening a command line window on the machine where you want to create a cloned copy of the repsository. Then run the command git clone url, where url is the URL that describes your repository. You can get this URL by looking at your repository in the web browser, and clicking on the green "Clone or Download" button.
When you hit enter, Git may ask for your git Userid and password. Once you enter these, git will make a sub-directory of the current directory named with the repository name. If you "cd" to this subdirectory (make it your current directory), then you will see all of the files in that directory. You may edit these files, compile them, and test them in your local repository. Remember, you are updated the local cloned version of the repository, not the master repository.
See git clone for complete documentation of the git clone command.
arrow_back
Add Files to your Repository
Git keeps track of a specific list of files. If you create new files in a local repository directory, Git does not know about those files. You need to perform a special action to add those files to your repository. This is done by using the command git add file(s) where file(s) is the full file name of a specific file or list of files that you want Git to include as part of your repository.
Note that the git add command only updates your local repository, not the master repository. The added files need to be committed and pushed to make it to the master repository.
See git add for complete documentation of the git add command.
arrow_back
Check the Status of your Repository
You can use the git status command from your local repository to check the current status of your repository. The git status command will tell you:
- All of the files in your local repository that git is tracking that are different than the master repository. This shows you what will be committed if you run a git commit command.
- All of the files in your local repository directory that git is not tracking. You may want to add one or more of these files using the git add command. (If you never want these added to your master repository, you can use the git ignore command.)
See git status for complete documentation of the git status command.
arrow_back
Commit Changes to your Repository
Once you have made and tested all the changes to your local repository (including adding files using git add if there are new files), use the git commit -a -m"commit comment" command to indicate that you are happy with your changes and you intend to move those changes to the master repository.
The commit comment is a line of text associated with these changes so you can remember what you changed.
The "-a" flag tells the commit command to commit anything that has changed. (If you don't specify the -a flag, then you need to include the names of all the changed files on the git commit command line.) You may want to run the "git status" command after running git commit to make sure everything has been committed corrrectly.
Git generates a commit hash code that can be used to indentify the specific version of your repository associated with the commit.
Remember, the git commit command does not update the master repository. You are only committing the changes in the local version of the repository. You still need a git push command to copy those committed changes to the master repository.
You can see all the committed versions of you master repository on the repository web site.
Multiple commits make sense... it's like saving a file in case the system goes down. The more often you commit, the more likely there will be a state you can go back to, before you made a mistake.
See git commit for complete documentation of the git commit command.
arrow_back
Copy committed changes to the Master Repository
Once you have committed changes to your local repository, the next step is to copy those changes to the master repository. This can be done using the git push command. The git push command will copy any committed changes from the local copy of the repository and copy those changes to the master version of the repository. After you complete a git push, you may want to look at the master version of the repository on the web and make sure the changes you expected are reflected in the master version. You may have to hit the "refresh" button in your browser to see those changes, and GitHub warns that sometimes it takes up to 10 minutes for those changes to get reflected, although usually, changes seem to occur almost immediately.
You can also use a git status command to make sure you changes have been pushed to the master.
See git push for complete documentation of the git push command.
arrow_back
Copy changes from the Master Repository
Most of the time, we will only be using a single local version (clone) of a repository, but if you ever have occastion to have mutliple local versions of a repository, and you use one local version to commit and push changes to the master, then the second copy of the repository will not have those changes. In this case, when you want to work on the second version of the repository, start off with a git pull command. The git pull command tells git to pull any changes in the master repository that have not been made to the local copy into the local copy.
If you don't remember to do a git pull in the second copy of your repository, and start making changes to the second copy, those changes could conflict with the changes made to the master, and could cause problems. To avoid these problems, it's best to always do a git status at the start of a session, and do a git pull if there are any changes to the master that need to be propagated locally when you are using multiple clones of a repository.
See git pull for complete documentation of the git pull command.
arrow_back
Basic GitHub Terminology
- add
- The git add command allows you to add files in a local repository directory that were not previously a part of the local repository to the local repository. After adding files, you still need to commit and push the local repository to add the files to the master repository.
- clone
- The git clone command creates a local repository from the master repository by copying the current contents of the master repository to local disk space.
- commit
- The git commit command is your way of telling git that you have finished making a round of changes to your repository. Each commit creates a new version of your code, and you can retreive the code at that level from git.
- commit hash
- The commit hash code is a long (16 or 32 hex digit) hexadecimal string that is unique to a specific committed version of your repository. It is computed by a hash algorithm that reads all the files in the repository, so if any of those files change, the hash code will not match. When you commit a repositiry, Git generates a commit hash code and reports the hash code. You can retreive the latest commit hash code using the command git rev-parse HEAD. When you browse your master repository, you can see all the versions and the commit hash codes and commit comments associated with those versions.
- conflict
- If you have multiple clones or local repositories of a master repository, call them local repository A and local repository B, and you make local changes to both local repositories, then you must commit and push changes from one of the repositories first. Suppose you commit and push changes from repository A first. Then, you have two choices for local repository B, but buth result in a conflict.
- One option is to pull the changes from the master repository into repository B. If git allowed you to do a pull with no warning, it is possible that the changes made to local repository A are in the same file that you have made different changes to in local repository B, and importing the A changes could destroy or invalidate the changes you have made in local repository B. Instead, git will report a conflict, and give you options to resolve the conflict. (Keep the A changes, keep the B changes, or try to automatically merge the A and B changes.)
- The other option is to try to push the changes from local repository B into the master repository. Again, if git were to respect the push, then the changes made in repository B could clobber or invalidate the changes made in local repository A, which have already been pushed to the master repository. Again, git reports that a conflict has occured, and requires you to resolve the conflict before the push completes.
If the local repository A changes don't interact with the local repository B changes (for instance, the A changes and B changes were on different files, or different parts of the same file), then allow git to automatically merge the changes. If the A and B changes were to the same part of the same file, then you will need to accept the A changes or the B changes, and manually remake whichever changes you did not accept.
It's best to avoid conflicts altogether. Avoid conflicts by only making changes to one local repository at a time. When those changes are complete, commit and push those changes to the master, and then be sure to pull those changes in any other local repository before changing anything else.
- Git
- A software version control infrastructure invented by Linus Torvalds as an alternative to the compilicated version control systems available at the time. Version control is managed using the command git, followed by a command name such as "clone" or "status", followed by parameters.
- GitHub
- A cloud-based Git service, administered by MicroSoft, and provided to us (as students) for free.
- GitHub Classroom
- A classroom infrastructure built on top of GitHub. GitHub Classroom allows the Professor to create assignments that consist of an initial repository, and provide an invitation URL for the assignment. When the students open the URL, then can accept the assignment, which creates a private student repository that is accessable only by the student, the TA's and the Professor.
- Repository
- The basic "unit" of Git - a set of files required for one project, program, or programming assignment. The primary version of the repository is the master repository, which exists in the cloud. Copies (called "clones") of the repository can be created on your local disk space, and you can modify the local version of the repository. The basic job of Git and GitHub is to manage the synchronization of local clones of the repository with the master version in the cloud. A repository can be either a public repository or a private repository, but in order to prevent students from looking at their classmate's work, we will be using private repositories.
- GitHub Classroom
- An infrastructure that uses GitHub to enable a Professor to create assignments. Students may then "accept" that assignment to create private repositories which contain the files provided by the Professor, often including instructions on how to complete the assignment. Students may then modify their repositories, save those modifications to GitHub, and the Professor (and TA's) can then see the modified repositories and grade them.
- Local Repository
- A version of a repository created by the git clone command, that is saved in local disk space on a specific machine. After the clone command, the local repository is a copy of the master repository, but if you edit the files in the local repository, the local repository will no longer match the master repository. Once you are satisfied with your edits, you can commit your changes with a git commit command, which commits the changes in the local repository, but not in the master repository. The git push command will copy any committed changes from the local repository to the master repository.
- Markdown
- Markdown is a very simple "markup" language that Git uses to determine how to display text information in a web browser. Markdown files typically have a file type of .md, for instance the README.md file in a repository. You will not need to write Markdown files for this class, but if you ever need to write Markdown, here's a nice markdown cheat sheet for reference.
- Master Repository
- The primary version of a repository which contains the latest "committed" and "pushed" version of all the files in the repository. It is possible to create a new repository from scratch, but we will accept assignments from GitHub Classroom, which will create master repositories for us. The Master Repository is always kept in the cloud by GitHub, and can be viewed using a web browser because each master repository has its own URL. Master repositories can be cloned to local disk space where they can be edited. The web view of a repository shows the master repository, not any of the clones.
- Private Repository
- Only you and the people you specify can look at the contents of a private repository. Free GitHub accounts are not typically allowed to create private repositories, but GitHub Classroom creates private repositories that can only be viewed by you, the TA's and the Professor. That way, other students can't copy your work.
- Public Repository
- A repository that anyone with a GitHub userid can look at. If you have a free GitHub userid, repositories you create (except those created for you by GitHub Classroom) are public. Warning: If you create a public repository with class work, and other students copy it, both you and the other students will receive a zero for that assignment. You are responsible for maintaining the privacy of your own code.
- pull
- The git pull command copies any committed changes in the master repository to the local repository from which the git pull command was executed. If you have multiple local repositories, you should do a git status, and if necessary, a git pull command before making new changes to the local repository to avoide conflicts.
- push
- The git push command copies any committed changes in the local repository to the master repository.
- README
- The README.md file is typically used in each git repository to describe what is in the repository, and how to use it. In our case, the Professor will use the README file to describe how to do an assignment or lab, and how that assignment or lab will be graded. README files are typically markdown files so that they can be displayed in some meaningful way on a web browser.
- status
- The git status command shows the differences between the local repository from which the git status command was run, and the master repository from which the local repository was cloned.
arrow_back